感谢朋友支持本博客,欢迎共同探讨交流。
由于能力和时间有限,错误之处在所难免,欢迎指正!
原创作品,允许转载,转载时请务必以超链接形式标明文章原始出处 、作者信息和本声明。如果转载,请保留作者信息。
博客地址:https://gscsnm.github.io
邮箱地址:gscsnm@gmail.com
由于近期使用libvirt,但是发现中文学习材料很少,故来大概翻译一下官方的材料,恶心我一个人就行了,方面大家。本人水平有限,凑合着看吧。部分句子或段落的翻译加上了个人理解,不喜勿喷。
原文链接:
http://libvirt.org/docs/libvirt-appdev-guide-python/en-US/html/
第四章 客户域 Guest Domains
4.1. 概述
域(guest)是一个运行在虚拟机上的操作系统的实例。客户域(guest domain)可以引用一个运行的虚拟机或可用于启动一个虚拟机的配置。连接对象提供了方法列举客户域,创建新的客户域和管理现有的域。客户域的用 virDomainPtr 对象表示,有很多独特的标识符:
惟一标识符
ID :正整数,在一个主机上运行的客人域中是 独一无二 的。一个不活跃(inactive)的域没有ID。如果主机操作系统是一个虚拟的域,它给出了一个ID默认为0。例如,使用Xen, Dom0 表明一个客户域。其他域id将从1开始分配,每当新的域start,增加1。域ID通常不会被重用,直到整个ID空间都被使用。域ID空间至少16位的大小,但往往延伸到32位。
name :域的名字,short string,在一个主机上所有客人域中是 独一无二 的,包括运行的和不运行的域。为了获得最大的可移植性,应该只使用字符
0-9,a-z, -, _。许多虚拟机监控程序将存储域的配置文件,使用域的名字为文件名。
UUID :16个无符号字节,保证在任何主机上所有客户域是唯一的。 RFC 4122定义格式的uuid和提供了一种推荐算法生成uuid和保证唯一性。 如果主机操作系统本身就是一个虚拟域,然后按照惯例将分配全0的UUID。
客人域可能是临时的,或持久的。临时域只能在主机上运行时被管理,当断电/关机(poweroff)时,所有的痕迹就会消失。持久域有自己的配置保存在一个数据存储中。因此当客户域被关闭,仍然可以管理其不活动的配置。临时客户域可以通过定义一个配置文件转化为持久域。
一旦应用程序获得了域的惟一标识符,它常常会想获得相应的 virDomain 对象。有三个查找现有域的方法,lookupByID ,lookupByName 和 lookupByUUID, 使用域标识符作为参数。如果没有匹配的域存在,将返回 None。错误的对象可以查询如果需要找到具体的细节错误。
例4.1. 通过ID获取一个域对象1
2
3
4
5
6
7
8
9
10
11
12
13
14
15
16
17# Example-1.py
from __future__ import print_function
import sys
import libvirt
conn = libvirt.open('qemu:///system')
if conn == None:
print('Failed to open connection to qemu:///system', file=sys.stderr)
exit(1)
domainID = 6
dom = conn.lookupByID(domainID)
if dom == None:
print('Failed to get the domain object', file=sys.stderr)
conn.close()
exit(0)
注意:如果域没有运行的话(是不活跃的),lookupByID 方法不能使用。不活跃的域的ID都是 -1 。
例4.2. 通过name获取一个域对象
1 | # Example-2.py |
例4.3. 通过 UUID 获取一个域对象1
2
3
4
5
6
7
8
9
10
11
12
13
14
15
16
17# Example-3.py
from __future__ import print_function
import sys
import libvirt
conn = libvirt.open('qemu:///system')
if conn == None:
print('Failed to open connection to qemu:///system', file=sys.stderr)
exit(1)
domainUUID = '00311636-7767-71d2-e94a-26e7b8bad250'
dom = conn.lookupByUUID(domainUUID)
if dom == None:
print('Failed to get the domain object', file=sys.stderr)
conn.close()
exit(0)
使用UUID查询域对象的例子,使用打印格式的UUID。Python不支持使用原始字节的uuid。
The UUID example used the example above uses the printable format of UUID. Using the equivalent raw bytes is not supported by Python.
4.2. 列举域(Listing Domains)
libvirt类有两个列表,第一个包含运行着的(活跃的)域,第二个包含不活跃、持久性的域。列表是不重叠的、互斥集合。但是,在每组集合查询中,有可能域在停止或启动(though there is always a small possibility that a domain can stop or start in between the querying of each set. )。在文字后面描述的事件类中提供了一种方法,来追踪所有生命周期的变化,以避免这种潜在的紊乱情况。
列出活动域的方法,返回一个域id的列表。每一个运行域都有一个正整数的ID,并且独一无二的标识了主机上运行域。列出活跃域的方法 - listDomainsID() 不需要参数。出错会返回None,否则返回一个以 int 类型保存域 ID 的 Python 列表。
例4.4. 列出活跃域
1 | # Example-4.py |
除了正在运行的域,可能还会有一些持久的、非活动的域配置存储在主机上。使用listDefinedDomains进行列举,因为不活跃的域没有任何ID标识符,所以会返回一个包含域名字的列表。出错会返回None,否则返回一个保存了name(string)的 Python 列表。
例4.5. 列出不活跃的域
1 | # Example-5.py |
以上这些列举域(Listing Domains)方法不直接返回 virDomain 对象,因为当频繁进行列举域操作是可能导致不必要性能损失。但是,Python libvirt模块提供了 listAllDomains 方法列举所有领域,包括活跃的和不活跃。它返回一个Python 列表,列表里保存了 virDomain 实例。发生错误时返回None。 这个列表以是空的,这是表示不存在任何持久化的域。
listAllDomains 方法需要一个参数,这个参数是一个过滤器。如果参数值是 0,表示所有域将列出。否则,下列任何一个或所有的常数可以加在一起来创建一个过滤器。1
2
3
4
5
6
7
8
9
10
11
12
13
14VIR_CONNECT_LIST_DOMAINS_ACTIVE
VIR_CONNECT_LIST_DOMAINS_INACTIVE
VIR_CONNECT_LIST_DOMAINS_PERSISTENT
VIR_CONNECT_LIST_DOMAINS_TRANSIENT
VIR_CONNECT_LIST_DOMAINS_RUNNING
VIR_CONNECT_LIST_DOMAINS_PAUSED
VIR_CONNECT_LIST_DOMAINS_SHUTOFF
VIR_CONNECT_LIST_DOMAINS_OTHER
VIR_CONNECT_LIST_DOMAINS_MANAGEDSAVE
VIR_CONNECT_LIST_DOMAINS_NO_MANAGEDSAVE
VIR_CONNECT_LIST_DOMAINS_AUTOSTART
VIR_CONNECT_LIST_DOMAINS_NO_AUTOSTART
VIR_CONNECT_LIST_DOMAINS_HAS_SNAPSHOT
VIR_CONNECT_LIST_DOMAINS_NO_SNAPSHOT
例4.6. 获取所有的域对象
1 | # Example-6.py |
4.3. 获得域的状态信息
待翻译
一旦获得域实例,可以获取的信息域的状态。 信息,如操作系统的类型被托管,运行状态,ID、UUID等等。下面的方法将演示如何获取这些信息。
4.3.1。 获取一个域的ID
4.4. 生命周期控制
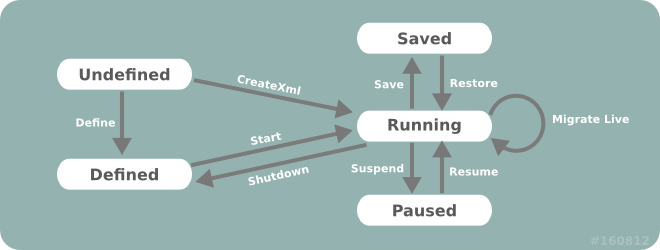
Libvirt可以控制guest域的整个生命周期。在域的整个生命周期中有一下几个阶段:
Undefined (未定义): 这是最初的状态。guest域还未被定义或未创建。
Defined (已定义): 客户域被定义但没有运行。这种状态也可以被描述为 Stopped(停止)。
Running (运行中): 正在运行的客户域是已经定义和运行了的。
Paused (暂停): 客户域处于暂停状态。他的内存映像已经暂时被存储,可以被恢复为 Running(运行中) 的状态。客户域的操作系统不会意识到曾经被暂停过。
Saved (保存的): 保存状态的域都有其内存映像,把 暂停 状态的内存映像保存为永久的存储文件。它可以被恢复为 运行 状态,客户域的操作系统不会意识到曾经被暂停过。
这些状态之间的转换可以分为几类:
- 4.4.1. “配置和启动”
- 4.4.3. “暂停/恢复和保存/恢复”
- 4.4.4. “迁移”
4.4.5. “自动运行”
客户域的生命周期转换图
4.4.1. 配置和启动
配置是指在创建新客户域时,通常使用的某种形式的操作系统安装介质。有各种各样的方法可以使用,但要根据不同的Hypervisor管理程序和域的类型进行选择。常见的应用程序支持几种不同的配置方法。Starting(开始)是指在Hypervisor上执行一个配置好的域。
4.4.1.1. 配置方法
有三种方法可以使用。
createXML方法将立即创建并启动一个新的临时客户域。当这个客户域关闭,所有的痕迹就会消失。defineXML方法将为一个永久性的(持久的)域存储配置文件。create方法将根据配置文件引导之前定义好的域。defineXML命令还可以用来把之前启动的临时客户域转换为持久域。
4.4.1.1.1. 引导临时域
引导一个临时域,只需要一个连接、一个包含XML文档描述所需的客户机配置的字符串和一个控制启动的标志。
如果设置了VIR_DOMAIN_START_PAUSED标志,将启动域,但它的cpu会继续暂停。cpu后可以用
resume方法启动。如果设置了VIR_DOMAIN_START_AUTODESTROY标志,当 virConnect 对象最终被释放时客户域将自动销毁。如果客户机崩溃或与libvirtd守护进程失去连接,也会自动小会。任何标记为自动销毁的域,将阻止迁移,保存到文件或快照。
例4.22. 配置临时域
1 | # Example-7.py |
如果域创建成功了,返回 virDomain 实例.否则返回 None。 尽管域成功booted,但不保证域正在running。客户域有可能崩溃,这种情况下,试图返回 virDomain 对象时将发生一个错误,因为临时的客户域关闭(或崩溃)后不存在了。处理这种情况需要使用一个永久的客户域。
4.4.1.1.2。 定义和引导一个永久性客户域
在永久性域启动之前,必须先定义它的配置。引导一个永久性域需要一个连接和一个包含XML文档配置的字符串。 来自已经定义过得客户域的virDomain 对象,也可以用来引导一个新的客户域。
目前, defineDomain 方法定义了一个flags参数但是未被使用。该参数直接写0即可。以后的版本中有可能用到这个flag参数。
例4.23. 定义和引导一个永久性客户域1
2
3
4
5
6
7
8
9
10
11
12
13
14
15
16
17
18
19
20
21
22
23
24
25# Example-8.py
from __future__ import print_function
import sys
import libvirt
xmlconfig = '<domain>........</domain>'
conn = libvirt.open('qemu:///system')
if conn == None:
print('Failed to open connection to qemu:///system', file=sys.stderr)
exit(1)
dom = conn.defineXML(xmlconfig, 0)
if dom == None:
print('Failed to define a domain from an XML definition.', file=sys.stderr)
exit(1)
if dom.create(dom) < 0:
print('Can not boot guest domain.', file=sys.stderr)
exit(1)
print('Guest '+dom.name()+' has booted', file=sys.stderr)
conn.close()
exit(0)
4.4.1.2. 新的客户域配置技术
本节首先说明两个配置,这两个配置是可用的,可以对比着看。然后概述了第三种配置,用于特定的虚拟硬件,有一定的意义。为了说明目的,下面的例子将使用XML配置,设置一个KVM完全虚拟化的客户域,有一个磁盘、一个网络接口,一个使用VNC显示的视频卡。
1 | <domain type='kvm'> |
!!!!重要提醒!!!!
注意初始内存的分配,过低可能会导致崩溃和安装失败。有些操作系统初始安装是需要高达600 MB内存,虽然运行时会减少。
4.4.1.2.1. CDROM / ISO镜像配置
所有的全虚拟化技术支持模拟CDROM设备。半虚拟化技术很难有支持模拟CDROM设备的。
改变XML配置:
- 添加一个CDROM设备来支持光盘安装。客户域的CDROM设备可以是主机CDROM设备,或一个ISO镜像文件。
- 确定BIOS启动顺序应该是什么,有两个可能的选择。如果硬盘写在在CDROM前,cdrom不会被启动,除非第一硬盘引导扇区是空白的。如果CDROM写在硬盘前,那么在安装后需要改变客户域的配置从硬盘引导。虽然两种都可以工作,但是第一种是最容易的。
上面的xml配置文件需要插入下面的内容:
1 | <os> |
这个硬盘的引导扇区最初是空的,所以第一次引导失败,然后会从CD-ROM引导。那么还需要一个CD-ROM设备。
1 | <disk type='file' device='cdrom'> |
确定要使用的配置,现在可以来创建客户域了。这个很简单,只需要一个定义好的持久的客户域,然后引导boot。
例4.24. 定义和引导一个永久性客户域1
2
3
4
5
6
7
8
9
10
11
12
13
14
15
16
17
18
19
20
21
22
23
24
25# Example-12.py
from __future__ import print_function
import sys
import libvirt
xmlconfig = '<domain>........</domain>'
conn = libvirt.open('qemu:///system')
if conn == None:
print('Failed to open connection to qemu:///system', file=sys.stderr)
exit(1)
dom = conn.defineXML(xmlconfig, 0)
if dom == None:
print('Failed to define a domain from an XML definition.', file=sys.stderr)
exit(1)
if dom.create(dom) < 0:
print('Can not boot guest domain.', file=sys.stderr)
exit(1)
print('Guest '+dom.name()+' has booted', file=sys.stderr)
conn.close()
exit(0)
如果不能保证硬盘的引导扇区是空白的,那么配置将是两步的过程。第一次临时客户域引导使用cd-rom驱动器作为主要的启动设备。一旦完成后,一个持久性配置的域将会从硬盘启动。
除了 defineXML 方法,另一种方法 defineXMLFlags 也是可用的。
4.4.1.2.2. PXE启动配置
一些新的完全虚拟化技术提供一个BIOS,能够使用PXE启动协议启动。如果一个环境已经有了PXE启动配置服务器部署,这是一个可取的方法。
更改配置:
- 显然使用PXE引导要求有一个网络设备。这个网卡连接的局域网,也需要一个PXE / TFTP服务器。
- 确定BIOS启动顺序应该是什么,有两个可能的选择。 如果硬盘写在网络设备前,网卡不会PXE启动,除非第一个硬盘引导扇区是空白的。如果网络设备出现在硬盘前,那么在安装后需要改变客户域的配置从硬盘引导。虽然两种都可以工作,但是第一种是最容易的。
最初的xml配置文件需要插入下面的内容:1
2
3
4
5<os>
<type arch='x86_64' machine='pc'>hvm</type>
<boot dev='hd'/>
<boot dev='network'/>
</os>
这个硬盘的引导扇区最初是空的,所以第一次引导失败,然后会从NIC网卡引导。确定要使用的配置,现在可以来创建客户域了。这个很简单,只需要一个定义好的持久的客户域,然后引导boot。
例4.25. PXE启动1
2
3
4
5
6
7
8
9
10
11
12
13
14
15
16
17
18
19
20
21
22
23
24
25# Example-14.py
from __future__ import print_function
import sys
import libvirt
xmlconfig = '<domain>........</domain>'
conn = libvirt.open('qemu:///system')
if conn == None:
print('Failed to open connection to qemu:///system', file=sys.stderr)
exit(1)
dom = conn.defineXML(xmlconfig, 0)
if dom == None:
print('Failed to define a domain from an XML definition.', file=sys.stderr)
exit(1)
if dom.create(dom) < 0:
print('Can not boot guest domain.', file=sys.stderr)
exit(1)
print('Guest '+dom.name()+' has booted', file=sys.stderr)
conn.close()
exit(0)
如果不能保证硬盘的引导扇区是空白的,那么配置将是两步的过程。第一次临时客户域引导使用NIC网络作为主要的启动设备。一旦完成后,一个持久性配置的域将会从硬盘启动。
4.4.1.2.3. 直接内核引导配置Direct Kernel Boot Provisioning
目前并不关系这部分,留着以后翻译吧。上原文!!
Paravirtualization technologies emulate a fairly restrictive set of hardware, often making it impossible to use the provisioning options just outlined. For such scenarios it is often possible to boot a new guest domain directly from an kernel and initrd image stored on the host file system. This has one interesting advantage, which is that it is possible to directly set kernel command line boot arguments, making it very easy to do fully automated installation. This advantage can be compelling enough that this technique is used even for fully virtualized guest domains with CD-ROM drive/PXE support.
The one complication with direct kernel booting is that provisioning becomes a two step process. For the first step, it is necessary to configure the guest XML configuration to point to a kernel/initrd.
Example 4.26. Kernel Boot Provisioning XML1
2
3
4
5
6
7
8
9
10
11
12
13
14
15
16
17
18
19
20
21
22
23
24
25
26
27
28
29
30
31
32
33
34
35
36<os>
<type arch='x86_64' machine='pc'>hvm</type>
<kernel>/var/lib/libvirt/boot/f11-x86_64-vmlinuz</kernel>
<initrd>/var/lib/libvirt/boot/f11-x86_64-initrd.img</initrd>
<cmdline>method=http://download.fedoraproject.org/pub/fedora/linux/releases/11/x86_64/os console=ttyS0 console=tty</cmdline>
</os>
```xml
Notice how the kernel command line provides the URL of download site containing the distro install tree matching the kernel/initrd. This allows the installer to automatically download all its resources without prompting the user for install URL. It could also be used to provide a kickstart file for completely unattended installation. Finally, this command line also tells the kernel to activate both the first serial port and the VGA card as consoles, with the latter being the default. Having kernel messages duplicated on the serial port in this manner can be a useful debugging avenue. Of course valid command line arguments vary according to the particular kernel being booted. Consult the kernel vendor/distributor's documentation for valid options.
The last XML configuration detail before starting the guest, is to change the 'on_reboot' element action to be 'destroy'. This ensures that when the guest installer finishes and requests a reboot, the guest is instead powered off. This allows the management application to change the configuration to make it boot off, just installed, the hard disk again. The provisioning process can be started now by creating a transient guest with the first XML configuration
Example 4.27. Kernel Boot Provisioning
```python
# Example-14.py
from __future__ import print_function
import sys
import libvirt
xmlconfig = '<domain>........</domain>'
conn = libvirt.open('qemu:///system')
if conn == None:
print('Failed to open connection to qemu:///system', file=sys.stderr)
exit(1)
dom = conn.createXML(xmlconfig, 0)
if dom == None:
print('Unable to boot transient guest configuration.', file=sys.stderr)
exit(1)
print('Guest '+dom.name()+' has booted', file=sys.stderr)
conn.close()
exit(0)
Once this guest shuts down, the second phase of the provisioning process can be started. For this phase, the ‘OS’ element will have the kernel/initrd/cmdline elements removed, and replaced by either a reference to a host side bootloader, or a BIOS boot setup. The former is used for Xen paravirtualized guests, while the latter is used for fully virtualized guests.
The phase 2 configuration for a Xen paravirtualized guest would thus look like:
1 | <bootloader>/usr/bin/pygrub</bootloader> |
With the second phase configuration determined, the guest can be recreated, this time using a persistent configuration
Example 4.28. Kernel Boot Provisioning for a Persistent Guest Domain
1 | # Example-18.py |
In addition to the createXML method, the alternative method createXMLFlags is available.
4.4.2. 停止Stopping
Stopping停止就是指停止正在运行的客户域。有两种方法:shutdown(关机)和destroy(销毁)。
shutdown方法是一个clean(正统的?)的停止过程,它将发送一个信号给客户域的操作系统要求其立即关闭。操作系统成功关闭后客户域才会停止。shutdown过程类似于物理机器上运行的shutdown命令。shutdownFlags方法也可以关闭域,取决于客户域的操作系统是否支持。
destroy和 destroyFlags 方法会立即终止客户域。这个过程类似拔下物理机器的电源。
4.4.3. “暂停/恢复” 和 “保存/恢复” (Suspend/Resume and Save/Restore)
suspend 和 resume 方法指暂停正在运行的客户域,暂时保存它的内存状态。过一会儿,有可能恢复到原来的运行状态,继续执行暂停前的任务。暂停不保存一个永久性客户域的内存映像(干这个事儿得用save)。
save和restore方法是指暂停正在运行的客户域,保存它的内存状态到一个文件中。 在一段时间后,可以恢复到原来的运行状态,继续执行暂停前的任务。
重要的是要注意,save/restore只有保存的内存状态,不保存存储状态。因此当客户域恢复后,底层存储必须完全与最初保存时的状态相同。基本用法就是客户域只能从任何给定的保存的状态镜像恢复一次。要想让客户域从同一个保存的状态镜像恢复多次,应用程序必须在saving时保存客户域的存储快照,恢复时明确的回到这个存储快照。未来的libvirt将允许自动快照功能可以保存内存和存储状态。
保存操作需要保存内存状态的文件的绝对了就。这个filename文件名在虚拟机监控程序的文件系统,而不是libvirt客户机应用程序。如果管理当地的管理程序,两者没有区别。但如果通过网络远程连接到一个系统管理程序,它是至关重要的。下面的例子演示了保存一个客户域叫“demo-guest”到一个文件。 它会检查确认客人在保存之前是运行的,尽管这在技术上是冗余的,因为管理程序驱动程序将做这样的检查。
例4.29. 保存客户域
1 | #原示例不能运行,修改后如下: |
save客户域需要一小段时间,执行完毕,保存的客户域会暂停。然后,可以使用保存的状态文件重启它,使用restore方法。如果客人已经运行管理程序驱动程序将返回一个错误。但是,它不会阻止试图从相同的状态文件恢复多次。 如前所述,它是应用程序的责任,以确保客户存储与saving保存镜像时是完全相同的状态。
此外, saveFlags 方法允许保存并同时修改配置( the saveFlags methods allows the domain to be save and at the same alter the configuration of the saved image.)。当域恢复时,新的配置将被应用。
还有另一种方法来保存一个域。使用 managedSave 方法也可以保存运行域状态,只有在这种情况下,由系统自动选择保存镜像的位置。此外,the domain will be restored to the save state when the domain is restarted.
例4.30. 恢复一个客户域
1 | # Example-21.py |
!!!注意!!!
恢复一个客人域后不更新域当前的日期/时间
当客户域恢复到它保存是的状态。这包括了日期和时间。客户域无法确定已经过去了多久,因为它被save了。这意味着当前时间不会自动更新无论在恢复操作之中或之后。
除了 restore方法,另一种方法 restoreFlags 也是可用的。
4.4.4 迁移 Migration
迁移是将客户域的镜像移动到某个地方,通常从一个系统管理程序Hypervisor到另一个节点的一个Hypervisor。有两种方法进行迁移。migrate方法需要一个程序建立连接,并连接到要迁移的目的节点。migrateToUri方法接受URI指定的一个连接,打开连接,然后通过指令将域迁移到这个连接。
这两个方法都传递一个参数来指定动态迁移。迁移成功完成,需要在源和目标之间共享存储。
migrate方法的第一个参数指定了到迁移目标的连接。这个参数是必需的。
migrate方法的第二个参数指定一组标记,控制如何迁移。如果不需要标记参数则应设置为0。
标识列表:
1 | VIR_MIGRATE_LIVE |
migrate方法的第三个参数指定一个新名称。并不是所有的虚拟机监控程序Hypervisor都支持这种操作。如果不需要重命名域的话,参数应该设置为None。
migrate方法的第四个参数指定URI定位迁移的目标。当目标系统上有多个Hypervisor时,URI是必须的。如果只有一个Hypervisor,参数可以设置为None。
migrate方法第五个(最后一个参数)指定可以最大使用的带宽(MiB/s)。如果不需要限制那么将参数设置为0。
使用 migrate 方法将客户域迁移到一个已经打开的连接。例子:
例4.31. 一个域迁移到一个开放的连接
1 | # Example-22.py |
migrateToURI 方法与migrate是相似的,除了第一个参数是目标URI,而不是一个现有的连接。
使用 migrateToURI 方法将客户域迁移到一个已经打开的连接。例子:
例4.32. 一个域迁移到一个开放的连接
1 | # Example-23.py |
住客人域迁移到一个URI使用 migrate 或者是 migrateToURI ,flag是 VIR_MIGRATE_LIVE 。例子:
1 | # Example-24.py |
除了 migrate 方法,还有 migrate2 , migrate3 , migrateToURI , migrateToURI2 , migrateToURI3 方法可以使用,针对不同种类的连接。
4.4.5. 自动运行 Autostart
客户域可以配置为自动运行。libvirt重启时,客户域将自动恢复。这是由一个API实现保存和恢复,路径无需用户输入。dom.setAutostart(1)
例4.34. 为域设置自动启动
1 | # Example-25.py |
4.5. 域配置
libvirt使用XML定义域。一切与域相关的,比如内存和CPU,都是在XML中定义的。在XML格式可以参考:http://libvirt.org/formatdomain.html 。如果您的系统 libvirt-devel 包已安装,也可以在本地访问 /usr/share/doc/libvirt-devel-version / 。
4.5.1. 引导模式
通过BIOS启动,可以使虚拟机监控程序(Hypervisor)支持完全虚拟化功能。在这种情况下,BIOS有启动顺序优先级(软盘、硬盘、光盘、网络)决定在哪里获得/找到引导的镜像(image)。
例4.35. 设置引导模式1
2
3
4
5
6
7
8
9
10<os>
<type>hvm</type>
<loader readonly='yes' type='rom'>/usr/lib/xen/boot/hvmloader</loader>
<nvram template='/usr/share/OVMF/OVMF_VARS.fd'>/var/lib/libvirt/nvram/guest_VARS.fd</nvram>
<boot dev='hd'/>
<boot dev='cdrom'/>
<bootmenu enable='yes' timeout='3000'/>
<smbios mode='sysinfo'/>
<bios useserial='yes' rebootTimeout='0'/>
</os>
4.5.2. 内存/ CPU资源
CPU和内存资源,可以在域被创建时定义,或者在域活跃或不活跃时动态的定义。
CPU资源是在创建域的XML文件中使用xml标记定义的。Hypervisor定义了一个最大限制的数量。这个最大的限制可以依赖的资源和管理程序的限制。
CPU XML规范的一个示例。
1 | <domain> |
内存资源是在创建域的XML文件中使用xml标记定义的。 最大和当前分配的内存域应该设置内存的一个示例XML规范遵循。
1 | <domain> |
域创建后,虚拟cpu数量可以通过 setVcpus() 或者setVcpusFlags()方法增加。cpu数量不得超过Hypervisor的最大限制。
1 | # Example-29.py |
例4.36. 设置域的最大虚拟cpu的数量
域创建后,内存可以通过 setMemory 或者是 setMemoryFlags 方法更改。内存数量应该用字节表示。1
2
3
4
5
6
7
8
9
10
11
12
13
14
15
16
17
18
19
20
21# Example-30.py
from __future__ import print_function
import sys
import libvirt
domName = 'Fedora22-x86_64-1'
conn = libvirt.open('qemu:///system')
if conn == None:
print('Failed to open connection to qemu:///system', file=sys.stderr)
exit(1)
dom = conn.lookupByID(6)
if dom == None:
print('Failed to find the domain '+domName, file=sys.stderr)
exit(1)
dom.setMemory(4096) # 4 GigaBytes
conn.close()
exit(0)
例4.37. 为一个域设置的内存量
除了 setMemory 方法,另一种方法 setMemoryFlags 也可用。
4.6. 监控性能
统计指标可用于监测域的资源利用率,vcpu,内存,块设备和网络。
4.6.1. 域块设备性能
获得磁盘的使用情况的统计数据,使用 blockStats 方法:
1 | # Example-31.py |
例4.38. 获取磁盘块I/O统计数据
返回值是一个元组,包含读(写)请求的数量,和实际传输的字节数。一个块设备是由镜像文件路径或设备总线名称确定的,域的XML文件中devices/disk/target[@dev] 指定的。
除了 blockStats 方法,另一种方法blockStatsFlags 也可用。
4.6.2. vCPU性能
要获得vcpu的性能数据,需要使用getCPUStats 方法。
1 | # Example-33.py |
例4.39. 各个VCPU统计数据,
getCPUStats 需要一个参数,是一个布尔值。 False 返回一个列表,列表中的元素是字典。每个cpu的信息,每个cpu为列表中的一个dict。 True 返回一个列表,显示的是整体的cpu情况。
参数对比图:
1 | # Example-34.py |
例4.40. 总CPU统计数据
4.6.3. 内存统计信息
使用 memoryStats 方法获得内存统计信息。
1 | # Example-35.py |
例4.41. 内存统计信息
请注意, memoryStats 返回一个字典对象。
这个对象包含一个不确定数量的条目,这个数量根据虚拟机监控程序和客人域的能力有关。
4.6.4. I/O统计数据
要获得网络信息,你需要域连接到主机网卡的名字(通常vnetX)。找到它,检索域的XML描述(libvirt会修改它在运行的时候)。然后,寻找devices/interface/target[@dev]元素(s):
1 | # Example-32.py |
例4.42. 得到网络I/O统计数据
interfaceStats 方法返回收到(传播)的字节数(数据包),和接受/传输错误的数量。